Friday, December 31, 2004

Painting the Cabinet Black

My Father-in-law got me some Black Semi-Gloss paint from the family Company, so special thanks go out to DarkZone for the Paint, check out their website here....

I gave the Cabinet 3 Coats of Paint and I got this done quite quickly as it was fast drying paint and could be re-coated in 30-45 minutes.I am sure the 32°C summer day help dry the paint.

I made a back panel for the Marquee and the Cabinet out of MDF and also painted this with the black paint. I also drilled two holes in the panels to make it easier to fit and remove them.

After the final Coat was dry I moved the Cabinet into my Games Room for the final construction and Setup. Even with no hardware in the cabinet it was very heavy and the use of a trolley made it just that little bit easier.

Thursday, December 30, 2004

Modification to Take a TV

I have at last got some more free time to do some work on my Arcade Machine. I removed the Cabinet from the Shed and gave it a good clean to remove all the dust and Cobwebs.

After some discussions with my wife I am now going to use a TV in my Arcade Machine that we previously had in our bedroom. I measured the TV and have had to alter the height of the shelf and also had to remove some wood from below the Marquee for it to fit correctly. I also had to remove all the other wood work I had done to hold the monitor including the supports for the Bezel.

Tuesday, December 21, 2004

Name Change and New MameWah Screens

I have made a decision to change the name of this project and the Arcade Machine to "Classic Arcade - Red vs Blue" as I have found that I am now looking at more than just fighting games and in particular two player games were you play against each other in some kind of head-to-head mode.

So to reflect this change I have made some new generic Mamewah Screens to be used. I will have a screen for each game list within a chosen emulator and these are reflected by the icons on the right hand side of the screen shoot. The row of icon along the top are the different emulators that I am going to setup and use.

Monday, October 18, 2004

Pinball Buttons

Drilled holes in the right and left side of the Arcade Machine for two Pinball Buttons this weekend.

Monday, October 04, 2004

Monitor Mounting & Bezel

I have completed the Monitor Mounting this weekend and also added a Bezel to cover the front of the arcade machine were the monitor sits. I had to use my jigsaw and sander to cut out the hole and get the lines kind of straight. I am looking at covering the bezel with some kind of contact and as a finishing touch covering with plexi-glass after I add some artwork and directions on how to use the arcade machine. I also drilled a button hole in the bottom of the control panel over hang that will house the computer start button. I am also going to mount the speaker volume and hand phone jack under here after I run some test on the Speakers I am going to use. I will also be adding some pinball buttons to the side of the arcade machine soon...

Friday, September 17, 2004

Site Update

Sorry that there have been no updates on this project but I have had to commit all my spare time to my new daughter Ashleigh who is now 9 Months old. I hope to get a bit more work done on the Arcade Machine in the next couple of weeks, so stay tuned for some progress.


Monday, July 19, 2004

Speaker Holes, A Shelf & Some Test Fitting

Finally got back to doing some work on my Arcade Machine this weekend. I have now cut the holes for the 4" Speakers by using the plastic mounts as a template to size up the hole. I drilled a pilot hole first for the jigsaw blade and then cut the rest of the hole with my jigsaw.

I also added the shelf for the Monitor and tested the fit with the monitor and its is perfect. I also tested the Control Panel Fit and this is also perfect.

Monday, June 28, 2004

Control Panel Wiring

Wired up the Control Panel this weekend. I started by wiring the Ground on each microswitch and split this into two different circuits, one for Player 1 and the other for Player 2. Next I wired each Button to its corresponding connection on the IPAC.


Once all the wiring was done I hooked up the Control Panel to the Computer via the PS2 cable and booted, and what I got was an Keyboard Error. So for the next couple of hours I troubleshooted this until I found the source of the Error: A FAULTY connector on the IPAC. If I had the COIN2 wired then I would get the error but without the connection the Keyboard is detected correctly and boots.

Wednesday, June 23, 2004

Control Panel Covering & Mounting

I got the control panel overlay from Ozstick yesterday. I covered the Control Panel last night with the overlay and cut the holes with a knife. I had all the buttons and joysticks mounted in less than a hour and I am more than pleased with the results. The overlay looks and feels very professional and should hopefully last for a few years of use.

Tuesday, June 22, 2004

The Monitor Shelf & CP Test Fitting

Added the frame for the monitor shelf this weekend. I made the frame out of pine and secured it to the cabinet with 35mm wood screws. All I need do now is make the top and secure that down.


I also tested the positioning of the Player 1 Joystick to ensure it did not hit the side rail of the control panel frame and it fitted in with over a 5mm gap.

Thursday, June 10, 2004

Control Panel Construction Update

Finally managed to do some more work on the control panel by finishing off the drilling on the Administration button holes and bolt holes for the joysticks. I also built and fitted the frame to hold the Control Panel into the cabinet.

Monday, May 24, 2004

Control Panel Started

Well I have finally gotten around to starting the Control Panel for my Arcade Machine and here's what I did this weekend.

I cut the Control Panel from a piece of MDF (8mm Thick) using a Circular Saw that gave me a nice clean line on the cut. Next I had to trim the Control Panel, as it was 5mm to wide for the cabinet, so I got out my trusty Jigsaw and trimmed away.


Now that I had my Control Panel cut to the correct size to fit into the cabinet, I applied my template to the Control Panel only to find it was to wide!!! I had made a BIG mistake, the width was out my 40mm. I scratched my head for a while and then realised that when I was originally measuring the Cabinet I had included the sides in my measurement (20mm each side), as I was going to do an extended Control Panel and not a fitted Control Panel as I am doing now. Anyway I got around this for now by just lining up the ends of the template to each end of the Control Panel with the center overlapping.


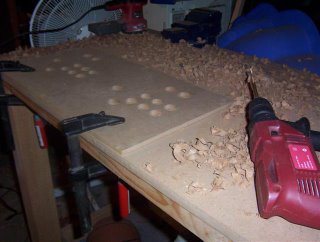
I clamped down the Control Panel on top of a scrap piece of MDF and drilled pilot holes. I drilled all the Button and Joystick Holes (except the top 3 Control Buttons: ESC, ENTER and PAUSE) using a 1 1/8 Inch Spade Bit. I was more then pleased with the results as all the holes lined up correctly, not like my Test Control Panel I made. I Sanded down the rough edges and then did some test mounts of the buttons and their placements.
Wednesday, May 12, 2004

Control Panel Plans Revealed


I have just finished my control Panel Plans for the Cabinet. The Plans where created in Microsoft Visio 2003 and are available for download from my Downloads section. I based the controls on a fighting game style layout that I felt comfortable with. I have a seventh button which is a thumb button and will be used as a block button in MK and the bottom row including the black button will be used for NEO GEO games. I also included two side buttons for the cabinet to play Pinball games using Visual Pinball, once I get this emulation up and running.

Saturday, May 08, 2004

Mame on a Pocket PC

While I have been resting with my back (which is now nearly fully better) I have been playing around with a version on Mame that runs on a Pocket PC, its called MameCE and is based on the Mame Release 0.36. I have tried a few games on my DELL AXIM X5 and they work flawless at full speed with sound. So if you have a Pocket PC I would suggest you check it out at this address below:

http://www.mameworld.net/mamece3/

Here are a couple of photo's I took of MameCE3 running...


Thursday, May 06, 2004

Software Update

With my back still hurting from the incident last week I decided to completed the computer hardware setup. I am using a AMD 2400+ on a ASUS Board (A7N8X Deluxe) with 512MB Memory and a GeForce2 MX Graphics card with SVIDEO and COMPOSITE out connectors. The Hard Drive is an 80GB Seagate to hold all the data with space for other emulation later on.

Installed Windows XP back onto the computer and setup MameWah and Mame. MameWah is working correctly and I now have the job of sorting out the Games into various lists like Favorites, Fighting Games, Platforms, etc...

I have had to re-install the Operating System as a 30GB IBM Hard Drive I had in the system as a slave failed over the weekend and somehow managed to corrupt my main 80GB hard drive. So I have had to do some re-setting up of software...

Wednesday, April 28, 2004

No More Sanding...

Finally finished sanding the cabinet this weekend (It was a long weekend here in Australia for ANZAC day). I had to borrow my father-in-laws Belt Sanding to sand down the wood left from the old arcade monitor stands. This worked really well as the surface is now nice and smooth and ready for my new TV mounts. I filled some hole and cracks with wood cement and sanded these down aswell giving the outside a nice even finish. I also finished sanding down the rest of the cabinet I did not finish last weekend ready for priming and painting. So the sanding is finished and i'm am ready to move onto the next stages of building the Control Panel.

I also hurt my back on Monday while I was working on my cabinet. It happened when my lovely 2 year old Labrador stole my dust pan and brush, and when I went to get it off her I stretched in the wrong direction and wack, I had a lower back spasm and have been in pain ever since. So the downside is I might not be doing much physical work on the cabinet until my back is better but I can still finish constructing the Computer and installing the software.

Monday, April 19, 2004

Sanding Back the Paint

Spent 2 hours this weekend sanding down the cabinet back to it original finish. Prior to starting the sanding I removed the T-Moulding which was not in as good a condition as I thought it was originally, so it looks like I am going to have to buy some new stuff as some point. I also removed some more of the old arcade monitor support and again this had been glued and tacked in. The mess this has left will need to be sanded down but I currently only have an Orbital Sander and this will not do the job, so it looks like I am going to have to borrow a Belt Sander for next weekend.

Finally got onto sanding the Cabinet and got the Right Panel, Front Bottom Panel, Part of the Top Panel and Half the Left Panel Sanded before I lost Light and had to go inside for dinner. The Right panel has a lot of Chips, Scratches and old Screw Holes so this will need to be filled with Wood Cement and sanded next week.


Tuesday, March 23, 2004

Wiring the Test CP

Joystick Wiring

IPAC Wiring

Started off by wiring all the Ground connectors to the IPAC. This gave me some good practice in cutting, stripping and connecting the Quik Connects. Next I connected each button to its assigned connection on the IPAC and after this I did the same with the Joystick. I was really eager to test the CP now so I hooked it all up and it worked, well except for the small problem of me wiring the Joystick around the wrong way, I had the Left and Right & Up and Down connected opposite as I forgot the Joystick actually presses the opposite microswitch.

Button Wiring

Monday, March 22, 2004

Constructing the Test CP

Mounted Buttons onto my Test CP, some of which are a little loose due the the holes being a bit larger than they should due to my poor cutting skills. I had to remove the T-Stik Plus rod to mount the joystick correctly. This involved removing the button nut and then each part on the Rod, noting in which order I needed to put them back. The Joystick and Rod mounted correctly with no issues.

Monday, March 15, 2004

MameWah Backgrounds Finished

My Mamewah main, options and message backgrounds have been completed today. I created these in Macromedia Fireworks and exported them to a JPG format. The Images are from Capcom and SNK fighting characters.

I also completed the MameWah layout customisation today and this is available from my downloads sections. The layout currently only supports one emulator and that is Mame. I will add other emulators at another time, so stay tuned for an update...

Sunday, March 14, 2004

How to Drill Crap Holes in your Test CP

Created a test Control Panel template today with Microsoft Visio to use as my template for the holes that need to be drilled. I used some 4mm MDF I had in my shed for the Control Panel test and taped the visio template to the MDF. I drilled the holes for the Buttons and the Joystick (T-Stik Plus) using a 1 1/8" Spade Bit.

The holes I drilled ended up being really crap as the MDF moved when I was drilling. The actual holes where a bit out of shape because of this as shown in the photo above. What I have learnt from this is when I come to do my Final CP I am going to put another piece of wood below the CP and clamp it to my bench so there is no movement while I drill the Holes.

Sunday, February 08, 2004

Wire & Quik Connects

Went to Altronics today and picked up my Quik Connects and 100 metres of 18 Gauge Wire (This is what the guy in the store recommended when I explained its purpose and that 20 Gauge Wire is used in the US). I am going to split the Wire with a friend who is making a cocktail cabinet.


Monday, February 02, 2004

Buttons, Joysticks & an IPAC

Got my Buttons, Joysticks and IPAC from Ultimarc out of storage today. Still need to test all this equipment in some kind of test enviroment.

Joysticks


Microswitches


Buttons & Microswitches


IPAC (Keyboard Controller)

Monday, January 19, 2004

Cabinet Removed from Storage

Removed the old cabinet from its storage position in my garage and took some photos and measurements.

Coin Box

Marquee

Back

Front