Showing posts with label Construction. Show all posts

Sunday, January 23, 2005

Making a Bezel

I measured, cut and painted the TV Bezel this evening using 5mm MDF that has a finished white side. I drill 3 holes down each side to fix it to wood fame of the cabinet. I still have to make a bottom Bezel between the TV and and Control Panel.

Wednesday, January 19, 2005

Wiring up the Speakers

I mount the two car speakers that I bought into the top of the Marquee and they fit very nicely and look a little different on an Arcade Machine. Next I pulled apart a pair of Computer Speakers and removed the Power Unit and the AMP. I re-wired the car speakers in the Cabinet to the AMP and mounted both the AMP and Power Supply in a temporary position at the back of the cabinet next to the TV. I will later mount these in a better spot so that the volume and power button are accessible outside the cabinet. Ran a test game of Street Fighter Alpha 3 and the sound is brilliant, much better than I thought it was going to be.

Wednesday, January 05, 2005

Wiring up the Coin Mechanism

Wired up the Coin Mechanism today to except 20c pieces. I have an issue with Coin Mechanism only working if I hold down the Coin One Button. I have been troubleshooting this all day and have had no luck in fixing it when my father-in-law (an Electrician) came over and I explained the problem. He said it sounded like I had the micro switches on the buttons wired wrong (the switch was on not off) so we did some testing and guess what I did have the buttons micro switches wired wrong (my bad). My mistake came about by connecting them the same way as the joysticks micro switches, but they were different switches and as I found out the connections were different. Re-tested the Coin Mechanism and it now works with out an issue.

I have had to put a lock on the coin door sooner rather than later as my 1 year old daughter "Ashleigh" keeps on opening the door and trying to remove the wires.

Friday, December 31, 2004

Painting the Cabinet Black

My Father-in-law got me some Black Semi-Gloss paint from the family Company, so special thanks go out to DarkZone for the Paint, check out their website here....

I gave the Cabinet 3 Coats of Paint and I got this done quite quickly as it was fast drying paint and could be re-coated in 30-45 minutes.I am sure the 32°C summer day help dry the paint.

I made a back panel for the Marquee and the Cabinet out of MDF and also painted this with the black paint. I also drilled two holes in the panels to make it easier to fit and remove them.

After the final Coat was dry I moved the Cabinet into my Games Room for the final construction and Setup. Even with no hardware in the cabinet it was very heavy and the use of a trolley made it just that little bit easier.

Thursday, December 30, 2004

Modification to Take a TV

I have at last got some more free time to do some work on my Arcade Machine. I removed the Cabinet from the Shed and gave it a good clean to remove all the dust and Cobwebs.

After some discussions with my wife I am now going to use a TV in my Arcade Machine that we previously had in our bedroom. I measured the TV and have had to alter the height of the shelf and also had to remove some wood from below the Marquee for it to fit correctly. I also had to remove all the other wood work I had done to hold the monitor including the supports for the Bezel.

Monday, October 18, 2004

Pinball Buttons

Drilled holes in the right and left side of the Arcade Machine for two Pinball Buttons this weekend.

Monday, October 04, 2004

Monitor Mounting & Bezel

I have completed the Monitor Mounting this weekend and also added a Bezel to cover the front of the arcade machine were the monitor sits. I had to use my jigsaw and sander to cut out the hole and get the lines kind of straight. I am looking at covering the bezel with some kind of contact and as a finishing touch covering with plexi-glass after I add some artwork and directions on how to use the arcade machine. I also drilled a button hole in the bottom of the control panel over hang that will house the computer start button. I am also going to mount the speaker volume and hand phone jack under here after I run some test on the Speakers I am going to use. I will also be adding some pinball buttons to the side of the arcade machine soon...

Monday, July 19, 2004

Speaker Holes, A Shelf & Some Test Fitting

Finally got back to doing some work on my Arcade Machine this weekend. I have now cut the holes for the 4" Speakers by using the plastic mounts as a template to size up the hole. I drilled a pilot hole first for the jigsaw blade and then cut the rest of the hole with my jigsaw.

I also added the shelf for the Monitor and tested the fit with the monitor and its is perfect. I also tested the Control Panel Fit and this is also perfect.

Monday, June 28, 2004

Control Panel Wiring

Wired up the Control Panel this weekend. I started by wiring the Ground on each microswitch and split this into two different circuits, one for Player 1 and the other for Player 2. Next I wired each Button to its corresponding connection on the IPAC.


Once all the wiring was done I hooked up the Control Panel to the Computer via the PS2 cable and booted, and what I got was an Keyboard Error. So for the next couple of hours I troubleshooted this until I found the source of the Error: A FAULTY connector on the IPAC. If I had the COIN2 wired then I would get the error but without the connection the Keyboard is detected correctly and boots.

Wednesday, June 23, 2004

Control Panel Covering & Mounting

I got the control panel overlay from Ozstick yesterday. I covered the Control Panel last night with the overlay and cut the holes with a knife. I had all the buttons and joysticks mounted in less than a hour and I am more than pleased with the results. The overlay looks and feels very professional and should hopefully last for a few years of use.

Tuesday, June 22, 2004

The Monitor Shelf & CP Test Fitting

Added the frame for the monitor shelf this weekend. I made the frame out of pine and secured it to the cabinet with 35mm wood screws. All I need do now is make the top and secure that down.


I also tested the positioning of the Player 1 Joystick to ensure it did not hit the side rail of the control panel frame and it fitted in with over a 5mm gap.

Thursday, June 10, 2004

Control Panel Construction Update

Finally managed to do some more work on the control panel by finishing off the drilling on the Administration button holes and bolt holes for the joysticks. I also built and fitted the frame to hold the Control Panel into the cabinet.

Monday, May 24, 2004

Control Panel Started

Well I have finally gotten around to starting the Control Panel for my Arcade Machine and here's what I did this weekend.

I cut the Control Panel from a piece of MDF (8mm Thick) using a Circular Saw that gave me a nice clean line on the cut. Next I had to trim the Control Panel, as it was 5mm to wide for the cabinet, so I got out my trusty Jigsaw and trimmed away.


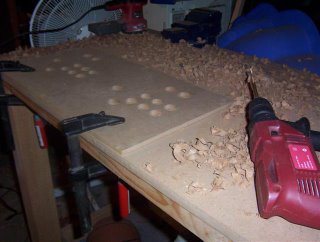
Now that I had my Control Panel cut to the correct size to fit into the cabinet, I applied my template to the Control Panel only to find it was to wide!!! I had made a BIG mistake, the width was out my 40mm. I scratched my head for a while and then realised that when I was originally measuring the Cabinet I had included the sides in my measurement (20mm each side), as I was going to do an extended Control Panel and not a fitted Control Panel as I am doing now. Anyway I got around this for now by just lining up the ends of the template to each end of the Control Panel with the center overlapping.


I clamped down the Control Panel on top of a scrap piece of MDF and drilled pilot holes. I drilled all the Button and Joystick Holes (except the top 3 Control Buttons: ESC, ENTER and PAUSE) using a 1 1/8 Inch Spade Bit. I was more then pleased with the results as all the holes lined up correctly, not like my Test Control Panel I made. I Sanded down the rough edges and then did some test mounts of the buttons and their placements.
Wednesday, April 28, 2004

No More Sanding...

Finally finished sanding the cabinet this weekend (It was a long weekend here in Australia for ANZAC day). I had to borrow my father-in-laws Belt Sanding to sand down the wood left from the old arcade monitor stands. This worked really well as the surface is now nice and smooth and ready for my new TV mounts. I filled some hole and cracks with wood cement and sanded these down aswell giving the outside a nice even finish. I also finished sanding down the rest of the cabinet I did not finish last weekend ready for priming and painting. So the sanding is finished and i'm am ready to move onto the next stages of building the Control Panel.

I also hurt my back on Monday while I was working on my cabinet. It happened when my lovely 2 year old Labrador stole my dust pan and brush, and when I went to get it off her I stretched in the wrong direction and wack, I had a lower back spasm and have been in pain ever since. So the downside is I might not be doing much physical work on the cabinet until my back is better but I can still finish constructing the Computer and installing the software.

Monday, April 19, 2004

Sanding Back the Paint

Spent 2 hours this weekend sanding down the cabinet back to it original finish. Prior to starting the sanding I removed the T-Moulding which was not in as good a condition as I thought it was originally, so it looks like I am going to have to buy some new stuff as some point. I also removed some more of the old arcade monitor support and again this had been glued and tacked in. The mess this has left will need to be sanded down but I currently only have an Orbital Sander and this will not do the job, so it looks like I am going to have to borrow a Belt Sander for next weekend.

Finally got onto sanding the Cabinet and got the Right Panel, Front Bottom Panel, Part of the Top Panel and Half the Left Panel Sanded before I lost Light and had to go inside for dinner. The Right panel has a lot of Chips, Scratches and old Screw Holes so this will need to be filled with Wood Cement and sanded next week.


Monday, March 22, 2004

Constructing the Test CP

Mounted Buttons onto my Test CP, some of which are a little loose due the the holes being a bit larger than they should due to my poor cutting skills. I had to remove the T-Stik Plus rod to mount the joystick correctly. This involved removing the button nut and then each part on the Rod, noting in which order I needed to put them back. The Joystick and Rod mounted correctly with no issues.

Sunday, March 14, 2004

How to Drill Crap Holes in your Test CP

Created a test Control Panel template today with Microsoft Visio to use as my template for the holes that need to be drilled. I used some 4mm MDF I had in my shed for the Control Panel test and taped the visio template to the MDF. I drilled the holes for the Buttons and the Joystick (T-Stik Plus) using a 1 1/8" Spade Bit.

The holes I drilled ended up being really crap as the MDF moved when I was drilling. The actual holes where a bit out of shape because of this as shown in the photo above. What I have learnt from this is when I come to do my Final CP I am going to put another piece of wood below the CP and clamp it to my bench so there is no movement while I drill the Holes.

Monday, January 19, 2004

Cabinet Removed from Storage

Removed the old cabinet from its storage position in my garage and took some photos and measurements.

Coin Box

Marquee

Back

Front