Tuesday, January 25, 2005

Bezel Instructions Artwork

I have finished the designs for the Bezel Instructions. These instructions show the operator how to use the machine correctly. I plan on using some kind of glue to fix these to the bezel and still need to research the best options.

Sunday, January 23, 2005

Making a Bezel

I measured, cut and painted the TV Bezel this evening using 5mm MDF that has a finished white side. I drill 3 holes down each side to fix it to wood fame of the cabinet. I still have to make a bottom Bezel between the TV and and Control Panel.

Friday, January 21, 2005

Modified MameWah Screens

I have updated the MameWah screens to be more TV Friendly and upgradeable. I have left the Game List Icons to the Right but have remove the emulator icons from along the top, there is now just one emulator icon (The current emulator) shown that connects to the corresponding game list. The top line now shows the selected games name and there are 3 artwork areas, the top right area will display the games Marquee, the middle right area will display the games title screen and the bottom right area will show a screen shot of the game. I have also remove the game count as it did not seem required and the ALL and Favorite Games list have been swapped to fall into line with MameWah's Game List creation function and design.

Wednesday, January 19, 2005

Wiring up the Speakers

I mount the two car speakers that I bought into the top of the Marquee and they fit very nicely and look a little different on an Arcade Machine. Next I pulled apart a pair of Computer Speakers and removed the Power Unit and the AMP. I re-wired the car speakers in the Cabinet to the AMP and mounted both the AMP and Power Supply in a temporary position at the back of the cabinet next to the TV. I will later mount these in a better spot so that the volume and power button are accessible outside the cabinet. Ran a test game of Street Fighter Alpha 3 and the sound is brilliant, much better than I thought it was going to be.

Sunday, January 09, 2005

It's Alive


Well I Finally have the Arcade Machine Working, below are some dark pictures of it running...

Wednesday, January 05, 2005

Test Marquee

Created a Test Marquee Design so that I could test Lighting with a temporary lighting source, Results where good just need to produce something a little better for the final design and this one is crap!

Wiring up the Coin Mechanism

Wired up the Coin Mechanism today to except 20c pieces. I have an issue with Coin Mechanism only working if I hold down the Coin One Button. I have been troubleshooting this all day and have had no luck in fixing it when my father-in-law (an Electrician) came over and I explained the problem. He said it sounded like I had the micro switches on the buttons wired wrong (the switch was on not off) so we did some testing and guess what I did have the buttons micro switches wired wrong (my bad). My mistake came about by connecting them the same way as the joysticks micro switches, but they were different switches and as I found out the connections were different. Re-tested the Coin Mechanism and it now works with out an issue.

I have had to put a lock on the coin door sooner rather than later as my 1 year old daughter "Ashleigh" keeps on opening the door and trying to remove the wires.

Friday, December 31, 2004

Painting the Cabinet Black

My Father-in-law got me some Black Semi-Gloss paint from the family Company, so special thanks go out to DarkZone for the Paint, check out their website here....

I gave the Cabinet 3 Coats of Paint and I got this done quite quickly as it was fast drying paint and could be re-coated in 30-45 minutes.I am sure the 32°C summer day help dry the paint.

I made a back panel for the Marquee and the Cabinet out of MDF and also painted this with the black paint. I also drilled two holes in the panels to make it easier to fit and remove them.

After the final Coat was dry I moved the Cabinet into my Games Room for the final construction and Setup. Even with no hardware in the cabinet it was very heavy and the use of a trolley made it just that little bit easier.

Thursday, December 30, 2004

Modification to Take a TV

I have at last got some more free time to do some work on my Arcade Machine. I removed the Cabinet from the Shed and gave it a good clean to remove all the dust and Cobwebs.

After some discussions with my wife I am now going to use a TV in my Arcade Machine that we previously had in our bedroom. I measured the TV and have had to alter the height of the shelf and also had to remove some wood from below the Marquee for it to fit correctly. I also had to remove all the other wood work I had done to hold the monitor including the supports for the Bezel.

Tuesday, December 21, 2004

Name Change and New MameWah Screens

I have made a decision to change the name of this project and the Arcade Machine to "Classic Arcade - Red vs Blue" as I have found that I am now looking at more than just fighting games and in particular two player games were you play against each other in some kind of head-to-head mode.

So to reflect this change I have made some new generic Mamewah Screens to be used. I will have a screen for each game list within a chosen emulator and these are reflected by the icons on the right hand side of the screen shoot. The row of icon along the top are the different emulators that I am going to setup and use.

Monday, October 18, 2004

Pinball Buttons

Drilled holes in the right and left side of the Arcade Machine for two Pinball Buttons this weekend.

Monday, October 04, 2004

Monitor Mounting & Bezel

I have completed the Monitor Mounting this weekend and also added a Bezel to cover the front of the arcade machine were the monitor sits. I had to use my jigsaw and sander to cut out the hole and get the lines kind of straight. I am looking at covering the bezel with some kind of contact and as a finishing touch covering with plexi-glass after I add some artwork and directions on how to use the arcade machine. I also drilled a button hole in the bottom of the control panel over hang that will house the computer start button. I am also going to mount the speaker volume and hand phone jack under here after I run some test on the Speakers I am going to use. I will also be adding some pinball buttons to the side of the arcade machine soon...

Friday, September 17, 2004

Site Update

Sorry that there have been no updates on this project but I have had to commit all my spare time to my new daughter Ashleigh who is now 9 Months old. I hope to get a bit more work done on the Arcade Machine in the next couple of weeks, so stay tuned for some progress.


Monday, July 19, 2004

Speaker Holes, A Shelf & Some Test Fitting

Finally got back to doing some work on my Arcade Machine this weekend. I have now cut the holes for the 4" Speakers by using the plastic mounts as a template to size up the hole. I drilled a pilot hole first for the jigsaw blade and then cut the rest of the hole with my jigsaw.

I also added the shelf for the Monitor and tested the fit with the monitor and its is perfect. I also tested the Control Panel Fit and this is also perfect.

Monday, June 28, 2004

Control Panel Wiring

Wired up the Control Panel this weekend. I started by wiring the Ground on each microswitch and split this into two different circuits, one for Player 1 and the other for Player 2. Next I wired each Button to its corresponding connection on the IPAC.


Once all the wiring was done I hooked up the Control Panel to the Computer via the PS2 cable and booted, and what I got was an Keyboard Error. So for the next couple of hours I troubleshooted this until I found the source of the Error: A FAULTY connector on the IPAC. If I had the COIN2 wired then I would get the error but without the connection the Keyboard is detected correctly and boots.

Wednesday, June 23, 2004

Control Panel Covering & Mounting

I got the control panel overlay from Ozstick yesterday. I covered the Control Panel last night with the overlay and cut the holes with a knife. I had all the buttons and joysticks mounted in less than a hour and I am more than pleased with the results. The overlay looks and feels very professional and should hopefully last for a few years of use.

Tuesday, June 22, 2004

The Monitor Shelf & CP Test Fitting

Added the frame for the monitor shelf this weekend. I made the frame out of pine and secured it to the cabinet with 35mm wood screws. All I need do now is make the top and secure that down.


I also tested the positioning of the Player 1 Joystick to ensure it did not hit the side rail of the control panel frame and it fitted in with over a 5mm gap.

Thursday, June 10, 2004

Control Panel Construction Update

Finally managed to do some more work on the control panel by finishing off the drilling on the Administration button holes and bolt holes for the joysticks. I also built and fitted the frame to hold the Control Panel into the cabinet.

Monday, May 24, 2004

Control Panel Started

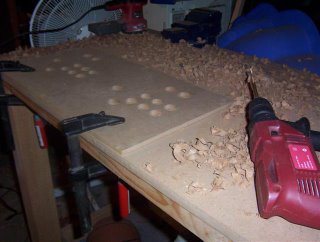
Well I have finally gotten around to starting the Control Panel for my Arcade Machine and here's what I did this weekend.

I cut the Control Panel from a piece of MDF (8mm Thick) using a Circular Saw that gave me a nice clean line on the cut. Next I had to trim the Control Panel, as it was 5mm to wide for the cabinet, so I got out my trusty Jigsaw and trimmed away.


Now that I had my Control Panel cut to the correct size to fit into the cabinet, I applied my template to the Control Panel only to find it was to wide!!! I had made a BIG mistake, the width was out my 40mm. I scratched my head for a while and then realised that when I was originally measuring the Cabinet I had included the sides in my measurement (20mm each side), as I was going to do an extended Control Panel and not a fitted Control Panel as I am doing now. Anyway I got around this for now by just lining up the ends of the template to each end of the Control Panel with the center overlapping.


I clamped down the Control Panel on top of a scrap piece of MDF and drilled pilot holes. I drilled all the Button and Joystick Holes (except the top 3 Control Buttons: ESC, ENTER and PAUSE) using a 1 1/8 Inch Spade Bit. I was more then pleased with the results as all the holes lined up correctly, not like my Test Control Panel I made. I Sanded down the rough edges and then did some test mounts of the buttons and their placements.
Wednesday, May 12, 2004

Control Panel Plans Revealed


I have just finished my control Panel Plans for the Cabinet. The Plans where created in Microsoft Visio 2003 and are available for download from my Downloads section. I based the controls on a fighting game style layout that I felt comfortable with. I have a seventh button which is a thumb button and will be used as a block button in MK and the bottom row including the black button will be used for NEO GEO games. I also included two side buttons for the cabinet to play Pinball games using Visual Pinball, once I get this emulation up and running.